This guide will take you through the process of creating a new table and editing the layout of an existing table.
This guide covers the new, improved way to create and edit tables in Obsidian 1.5 desktop and later. Working with a table is much easier than before this update.
How to Create a Table in Obsidian
The following three-step process will enable you to create a table in Obsidian.
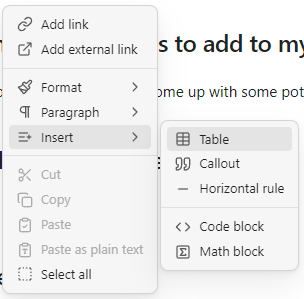
- Press the right mouse button
- On the menu, hover over Insert
- From the expanded menu, click on the table menu item
A table is created with two columns and two rows. It is possible to add more columns and rows if required, which we will cover in the following two sections of this guide.
How to add a column to an existing Obsidian Table
Once a table has been created, you can add a new column by hovering the mouse over the end of the table and clicking on the add column button, which appears.
How to add a row to an existing Obsidian Table
Like adding a column above you can hover the mouse at the bottom of a table to add a row.
If you are adding content to an existing table and are in the last cell, pressing enter will create a new row.
Conclusion
In this introductory guide to tables in Obsidian, you have learned how to create a new table in Obsidian and how you can add columns and rows to tables in Obsidian.
You can learn more about organising your notes in Obsidian in our guide.
I have also linked to our Obsidian content section, where you will find all our Obsidian content listed.